Author Archives: ArmgaSys

“DirectAccess server GPO settings cannot be retrieved” received from Remote Access Management Console

Here is the scenario:  You logon to your shiny new DirectAccess server, launch the Remote Access Management Console and click CONFIGURATION from the action pane.  A few seconds later you are greeted by the following message


DirectAccess server GPO settings cannot be retrieved.  Ensure you have edit permissions for the GPO.
GPO Remote Access Error


You frantically review your group policies and find that the DirectAccess Server Settings policy is available and applied to your DirectAccess server.

What the? (head banging start here)

The Root Problem
The message is misleading.  The real problem is the DirectAccess Client Settings policy!

What is really happening (probably)
If you have an Organizational Unit (OU) based active directory system, you have probably moved the DirectAccess Client Settings policy to the appropriate OUs so the appropriate workstations and laptops receive the policy.
I.E. something like this (where the policy applies to the HQ/Remote OU):
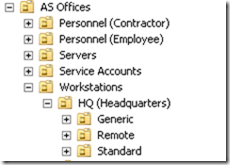
OU Layout


In doing so, you very likely removed the security filtering group the policy was associated to. 
It turns out this is a very bad thing in the world of DirectAccess.  The DirectAccess Client Settings policy must be available to the DirectAccess server… but should never be applied to the DirectAccess server .  In short, DirectAccess computers can only be identified via security filtering and *not* by assigning the policy directly to OUs.

UGH!

So, how do I fix this?

  1. Link the DirectAccess Client Settings policy to the top level of active directory OUs and not to individual OUs
    GPO OU Setting
  2. Filter where the DirectAccess Client Settings policy gets applied via a security group.
    (Remember, you don’t want to apply this policy to your DirectAccess server… or any other servers for that mater!)
    GPO Filtering

Remove / Reset DirectAccess Name Resolution Policy on DA clients

DirectAccess is a very cool technology!  But, as with all cool technologies, sometimes things go wrong.
And with DirectAccess, when things go wrong, your DirectAccess clients can find themselves in a very broken state.

Some of our favorite symptoms of a broken client include:

  • Unable to resolve names via the internal name server
    I.E. no more ping to internal resources
  • Clients can’t update policies
    (This  one is really nasty if you have a new DirectAccess policy and your clients are difficult to get onto the internal network without the help of FedEx)
  • User’s screams of “I can’t get on the network”

In many instances, these symptoms are a direct result of a broken Name Resolution Policy via a bad (or outdated) entry in the Name Resolution Policy Table (NRPT).
Never fear, removing those entries is very simple!

Removing NRPT policy on Windows 7 clients

  1. Navigate to Start and enter the following text into the search box to launch the Group Policy Editor
    GPEDIT.MSC
  2. Once the Group Policy Editor has launched, navigate to
    Local Computer Policy –> Windows Settings –> Name Resolution Policy
    GPEdit Navigation
  3. In the right hand pane, scroll to the bottom of the pane and locate the Name Resolution Policy Table
    NRPT
  4. Delete BOTH entries
  5. Restart your client


Removing NRPT policy on Windows 8 and Windows 10

  1. Navigate to Start and enter the following text into the search box to launch the Register Editor
    REGEDIT.EXE
  2. Navigate to the following registry node
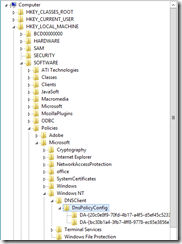
    HKEY-LOCAL-MACHINE –> Software –> Policies –> Microsoft –> Windows NT –>DNS Client –>DnsPolicyConfig
    2012 Register Edit
  3. Locate and delete the entries below DnsPolicyConfig which have the format of DA-{GUID} (There should be two entries)
  4. Restart your client


Now, you can rollout new domain policies to your client as needed.
Please remember that you will need an alternate method of connecting to your internal network such as a standard VPN or a very long network cable.

SharePoint: How to schedule a User Profile Full Synchronization

There is a lot of confusion around SharePoint’s scheduled User Profile Synchronization.  Here is the current truth:  There is no out-of-the-box support for a scheduled full synchronization for SharePoint User Profile Services… only incremental synchronization.  Yes, we know… you can always manually perform a full synchronization from the Central Administration UI.  But where is the fun in that?


Here is how to schedule automatic execution of the User Profile Full Synchronization :

Conventions:
For the purpose of this blog entry, we will assume all scripts are located in a folder at C:\Scripts\.


STEP#1:  Get the name of your User Profile Synchronization Application

  1. Launch the Central Administration UI.
  2. Navigate to Manage Service Applications
  3. Note the name for the User Profile Service
    In the screenshot below, the name is “User Profile Service”.  Your install may vary
    image


STEP#2: Create the PowerShell script
Place the following text into the following file: C:\Scripts\UserProfileSync.PS1

Add-PsSnapin Microsoft.SharePoint.PowerShell
$UPS= Get-SPServiceApplication | where { $_.DisplayName -eq “[UPSName]”}
$UPS.StartImport($true)

Important: Be sure to replace [UPSName] with the name of your user profile service from step#1

STEP#3: Schedule the task

  1. Launch Task Scheduler from Administrative Tools
  2. Right click and select Create New Task
  3. Fill out the General tab
    Important: Verify Run whether user is logged on or not and Run with highest privileges are both checked
    image
  4. Configure the Triggers as appropriate for your organization
  5. Create an Action to be fired when triggered
    Important:  You must setup the Action to launch PowerShell and point to the script via the parameters field
    image
  6. Configure all other parameters as appropriate for your organization


That’s it!  Simple!